
Machine Learning in .Net (ML.Net)

As a .NET developer, I am eager to explore the integration of artificial intelligence (AI) into my applications. Given the growing hype surrounding AI, I am particularly interested in understanding the practical steps involved in its adoption.
New AI models are constantly being released, and major tech companies are constantly competing to develop their own capabilities. This has prompted me to consider how I can leverage AI to enhance my applications.
I’ve decided to learn Artificial Intelligence (AI) as a C# developer to advance my professional development. Microsoft offers extensive documentation that serves as an entry point to connecting AI-related models and integrating them into applications. Consequently, I have commenced my learning process with ML.Net Model Builder, which serves as the foundational component for this integration.
General Explanation of the Machine Learning Concept
Machine learning is a branch of artificial intelligence (AI) that focuses on enabling computers to learn from data and improve their performance over time without explicit programming. In this context, the data is being trained using machine learning algorithms.
Requirements:
Visual Studio Code
Packages related to ML.Net
SDK: dotnet 8 SDK , ML.Net CLI
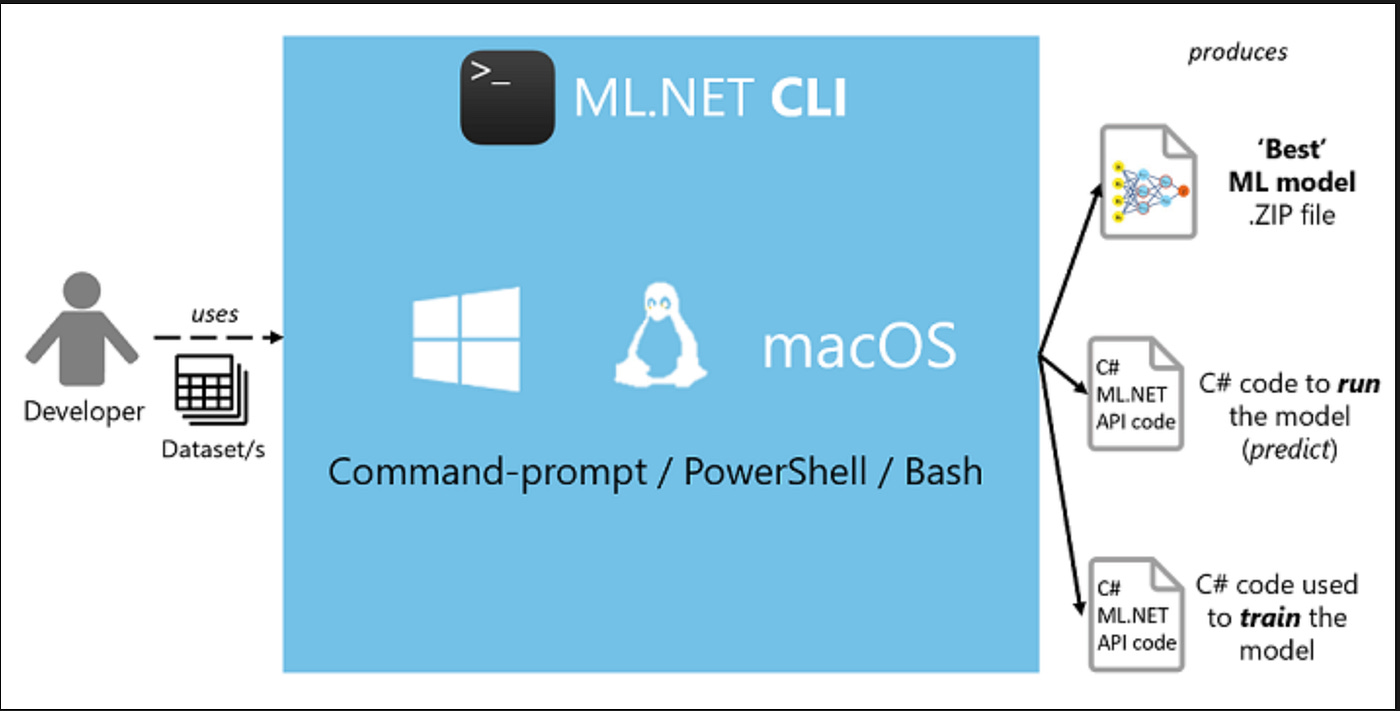
In this demonstration, I will illustrate the process of constructing a machine learning model using the ML.Net CLI. Subsequently, I will demonstrate how to execute this command to generate a zip file containing the model. Finally, I will guide you on how to incorporate the generated model into a RESTful API. This example serves as a fundamental introduction to ML.Net for developers proficient in .NET programming.
Problem statement:
Construct a machine learning model capable of predicting the fare for a taxi ride, considering diverse input variables such as vendor identification, rate code, passenger count, trip duration in seconds, distance travelled, and payment method.
Background:
Taxi fare prediction is a pivotal component of the transportation sector, enabling both drivers and passengers to accurately estimate the cost of a ride. Precise fare predictions not only elevate customer satisfaction but also facilitate the optimisation of pricing strategies and contribute to the overall efficiency of taxi services.
Data Description:
The dataset contains historical data of taxi rides with the following features:
Vendor ID: A unique identifier for the taxi vendor.
Rate Code: The rate code indicating the fare structure.
Passenger Count: The number of passengers in the taxi.
Trip Time in Seconds: The duration of the trip in seconds.
Trip Distance: The distance covered during the ride (in kilometers or miles).
Payment Type: The method of payment used (e.g., cash, credit card).
• Fare Amount: The total fare charged for the ride (target variable).
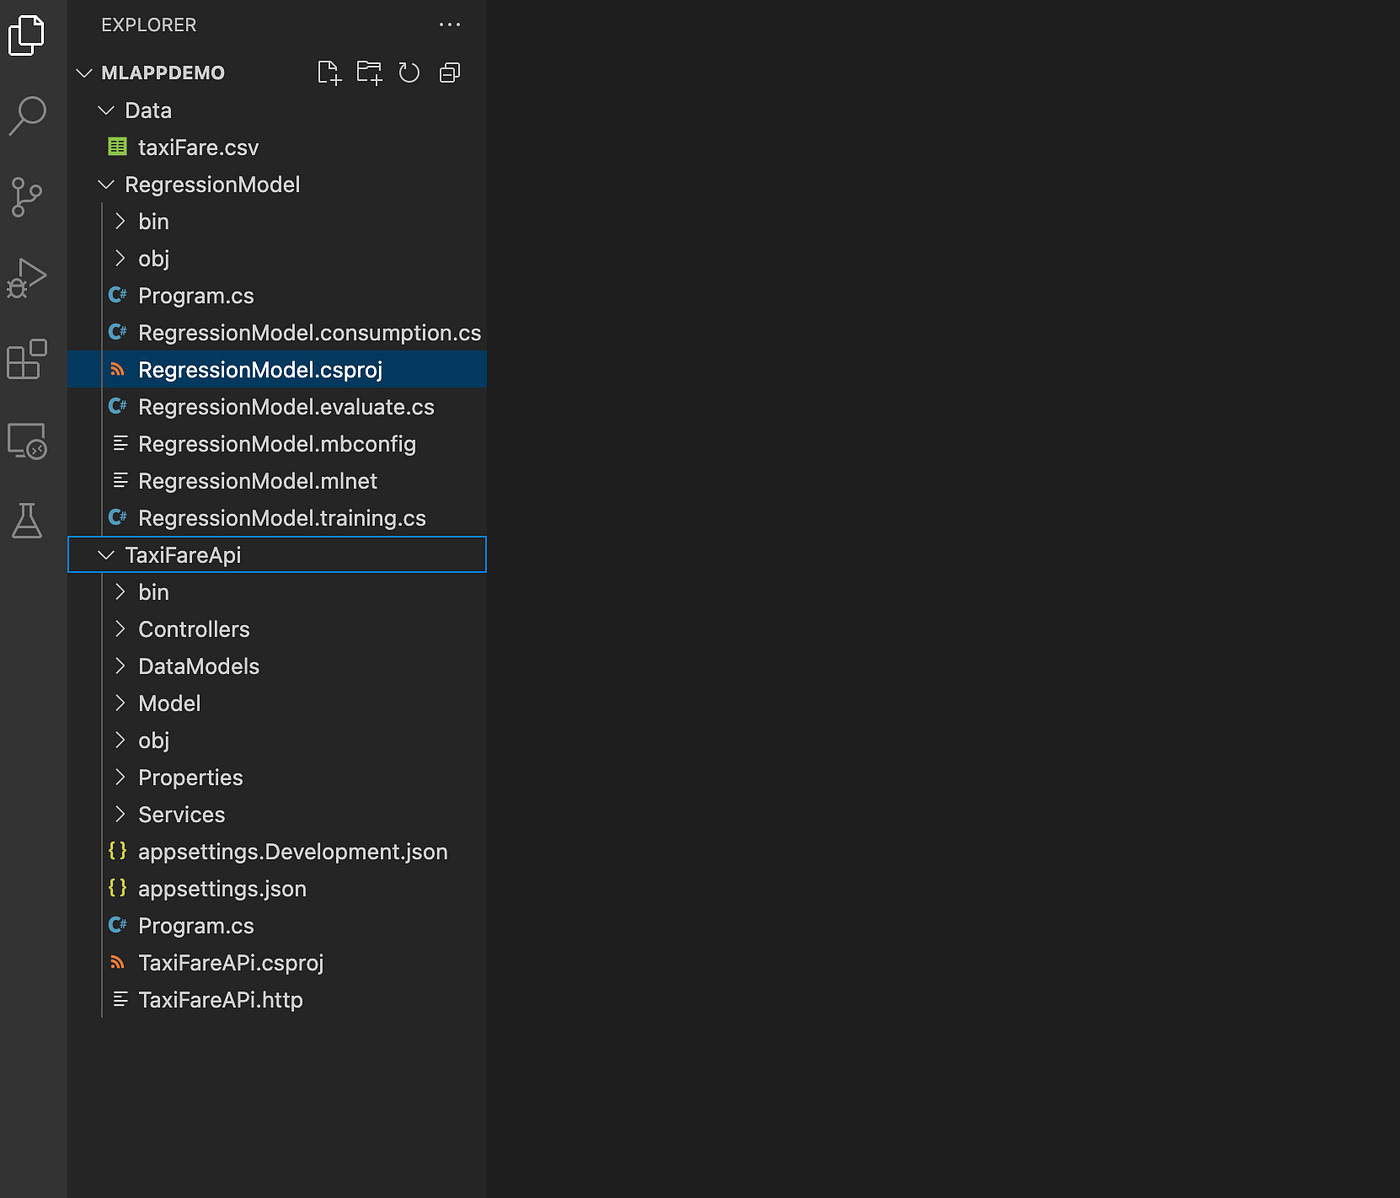
Below is the project structure .
Step 1:
Create a New Solution for the Demo Application.
In the first step, create a new solution in Visual Studio Code and create a folder named “Data” to store the sample data file.
To initiate the model generation process, we require the data for prediction. I will be utilising the sample data provided in the Microsoft documentation: https://raw.githubusercontent.com/dotnet/machinelearning/main/test/data/taxi-fare-train.csv. Please prepare this CSV file and load it into the newly created “Data” folder as per above project structure .
Step 2:
To generate the console application for our Model project, execute the following command:
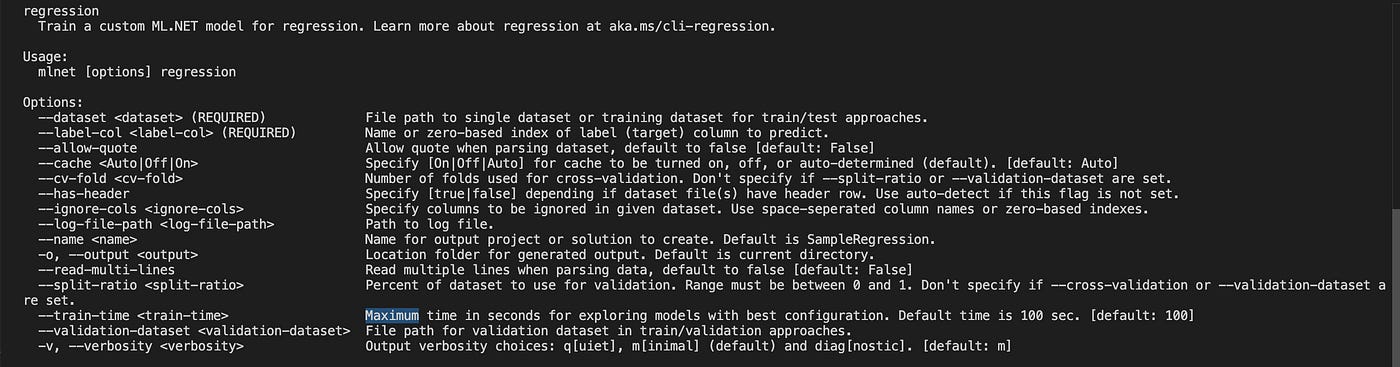
mlnet regression - dataset “Data/taxiFare.csv” - label-col 6 - has-header true - name RegressionModel - train-time 60Various mlnet commands are the below in order to train and develop the custom models .
Subsequently, the RegressionModel project is created, comprising the following files:
- Program.cs: This serves as the entry point to the application, where input data is passed to the Model and its output is extracted.
- mbconfig: This configuration file pertains to our Model project, detailing the CPU utilised for Model execution, column properties, and other relevant information.
- evaluate.cs class: The evaluate.cs class facilitates the evaluation of the model’s performance. Model Builder utilises the trained model to generate predictions on new test data, subsequently assessing the quality of these predictions.
- training.cs: This file is employed for training the model based on the provided data. Training is an automated process that instructs the Model Builder on how to respond to queries within the specified scenario. Once trained, the model can make predictions on input data that it has not encountered previously. For instance, if the objective is to predict taxi prices based on the input columns, the trained model will be capable of generating predictions on unseen data.
When running the console application , basically we are evaluating the model based on the internal algorithm which are already defined for the ML.Net task — Regression , the model get trained and processed in to .mlnet zip file
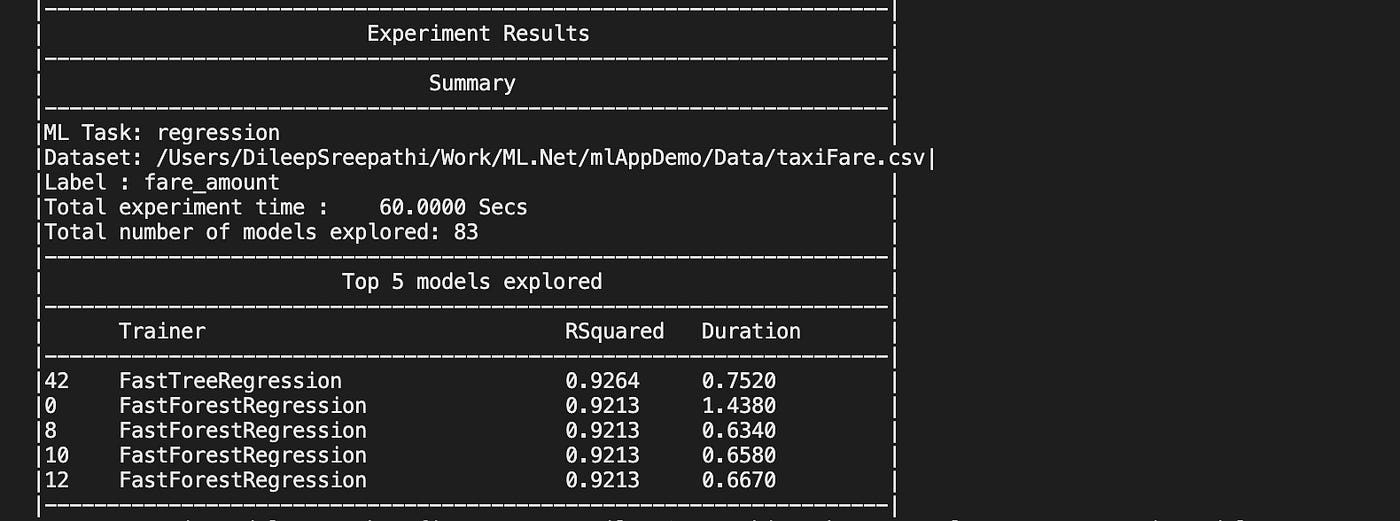
When training a model, it is possible to observe the algorithms it employs and the accuracy it will achieve based on their scores. As a developer learning about ML.Net, there is no need to be concerned about the intricate deep algorithms used behind the machine learning scenarios. Our initial step should be to comprehend how the ML model is generated and integrated. Once we have gained confidence in our overall understanding, we can focus on the data training process and identify algorithms that can be modified in the existing generated code to train our model for optimal accuracy scores.
Here’s a screenshot of when the model is training. It’s exploring all the available algorithms.
Now your model is ready to use it .
Let’s run the console application in order to test the model , navigate to your Model project and run the below command:
dotnet run
Output:

Step 3 : Consume the Model through Rest api .
Create the dotnet web api project using below command:
dotnet new webapi -n TaxiFareAPi -o TaxiFareApi - no-httpsAdd the below nuget packages for the API project in the .csproj file:
<PackageReference Include=”Microsoft.AspNetCore.OpenApi” Version=”9.0.0” />
<PackageReference Include=”Microsoft.ML” Version=”4.0.2” />
<PackageReference Include=”Swashbuckle.AspNetCore” Version=”8.1.1” />
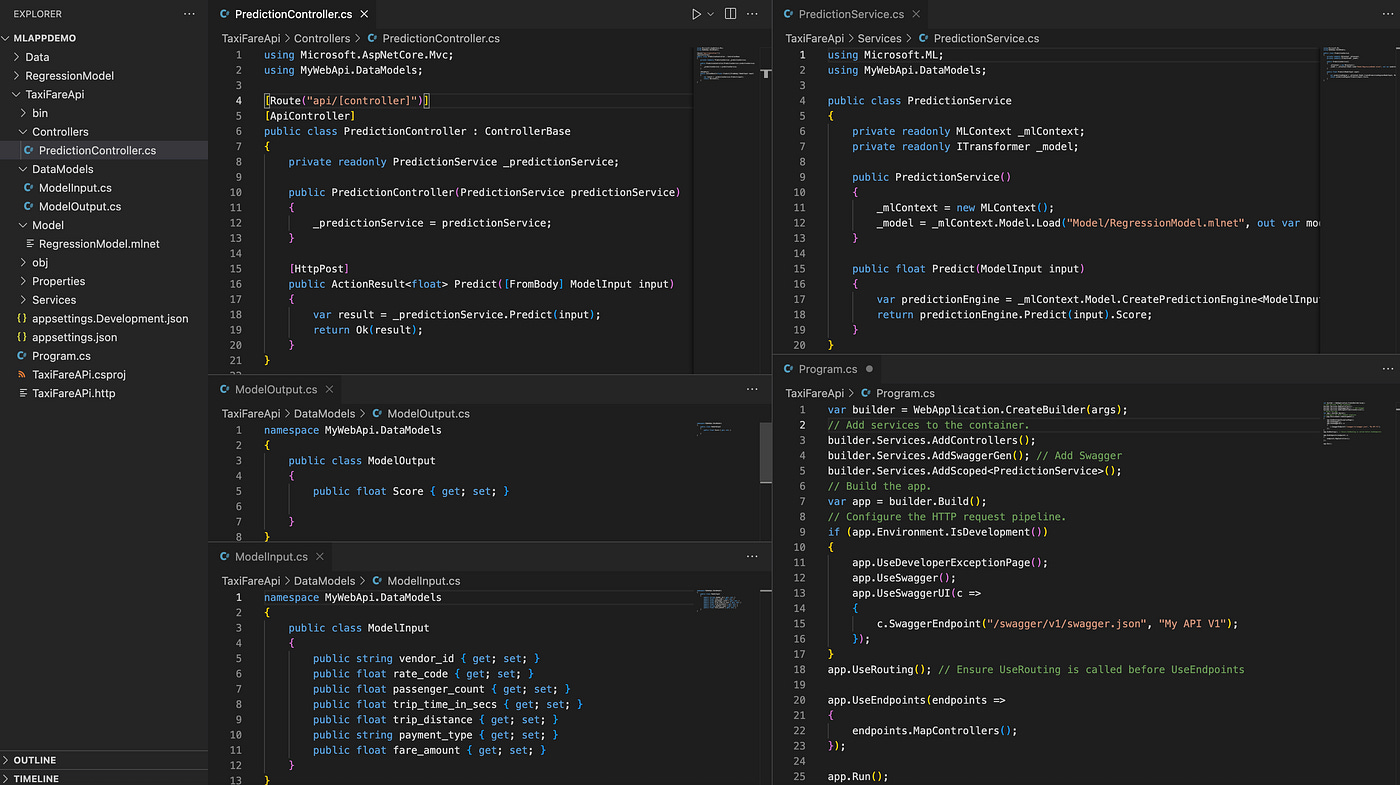
<PackageReference Include=”Microsoft.ML.FastTree” Version=”3.0.1” />Below are the Controller, Service, and Input/Output classes. The model consumption is implemented in the service class using the ML context and is subsequently called by the controller. This process ensures that the model is consumed.
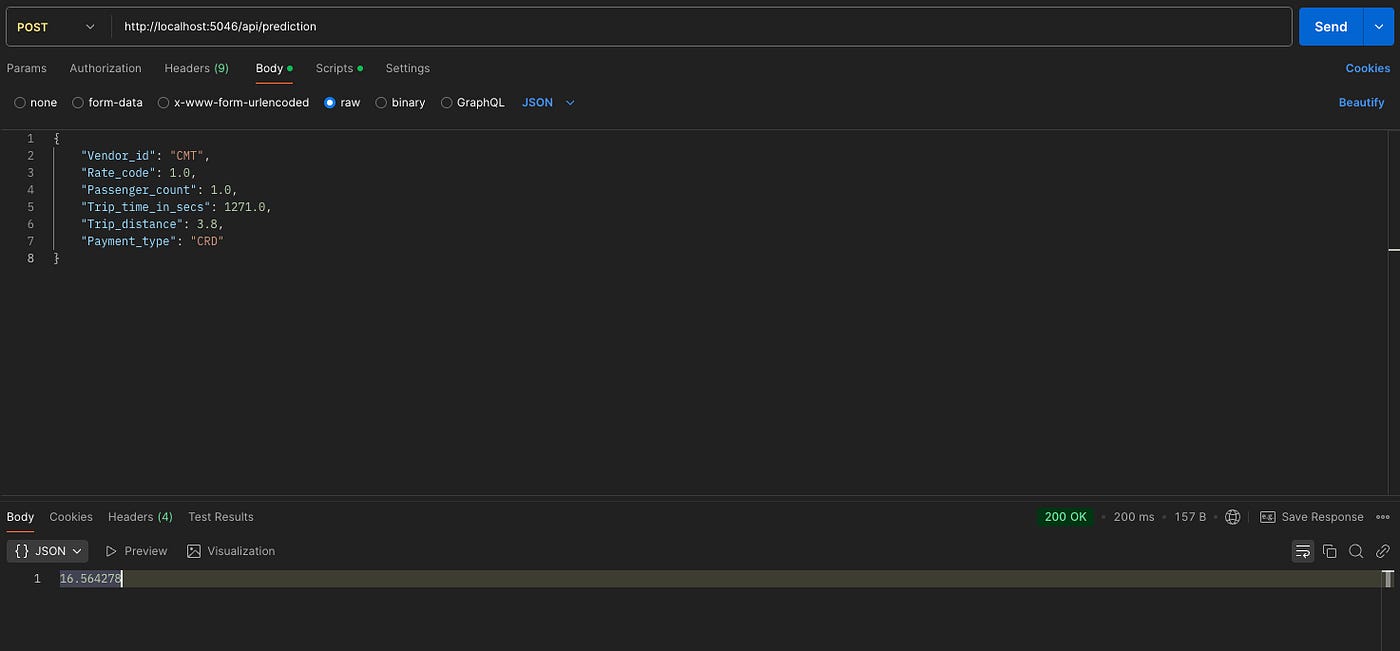
Upon constructing the API project and executing it on localhost, In order to test this on Postman will yield the following output:
Finally, we are able to comprehend the ML.NET Module on the dotnet platform. It offers a wide range of machine learning models for training and evaluating data to achieve greater accuracy, which can then be integrated into applications based on the problem statement. The ML.NET documentation provides various ML tasks and underlying algorithms for exploration. Additionally, Azure Open AI services offer pre-built models that can be easily integrated into our applications.
We can conclude that AI has the potential to perform more complex tasks and do so at an unprecedented speed. However, it is crucial to exercise caution when handling data, ensuring that it is properly prepared, trained, and evaluated. By adopting a systematic approach to organising all modules, we can harness the full potential of AI in our applications.
Next Steps in Learning in This Space:
- Practice various problem statements.
- Train models effectively with high accuracy.
- Understand the AI workflow, RAG, AI agents, and the latest buzzword, MCP (Model Context Protocol).
References:
https://learn.microsoft.com/en-us/dotnet/machine-learning/overview
I resonate with your consistently insightful approach to ML.Net, clarifying practical AI integration for C# devlopers.