
MCP Server
Part 1: Building Your First MCP Server: A Simple Calculator Tool in C#

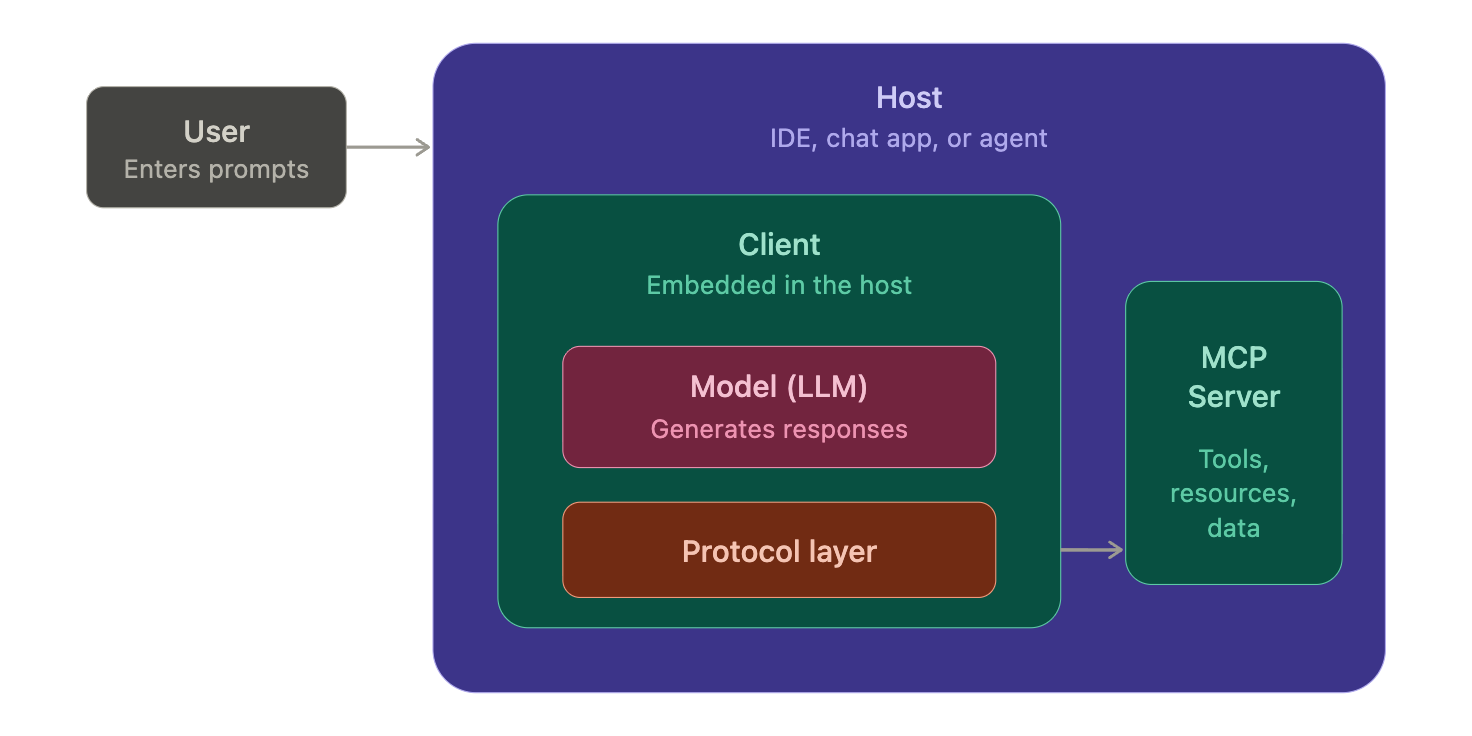
The Model Context Protocol (MCP) is an open protocol that standardizes how applications provide context to LLMs. Think of MCP like a USB-C port for AI applications - it provides a standardized way to connect AI models to different data sources and tools.
In the previous articles, you learned about the core concepts of the Model Context Protocol (MCP) — what it is, how it works, and why it matters. If not, check here:

In this article, I’m going to walk you through building a simple MCP server and setting up its environment from scratch. By the end, you’ll have a working MCP server that exposes a calculator tool that any MCP-compatible host (like Claude Desktop, VS Code Copilot, or your own client) can invoke.
What Are We Building?
A simple **MCP Server** that exposes a **Calculator Tool**. This tool will accept two numbers and return their sum. It’s minimal by design — the goal is to understand the structure and workflow, not to build something complex.
Prerequisites:
- .NET 10 SDK (or later) installed
IDE/Editor: Visual Studio Code.
Package Managers: NuGet
API Keys: For any AI services you plan to use in your host applications
Basic MCP Server Structure
An MCP server typically includes:
Server Configuration: Setup port, authentication, and other settings
Resources: Data and context made available to LLMs
Tools: Functionality that models can invoke
Prompts: Templates for generating or structuring text
For this demo, we’ll focus on Server Configuration and Tools.
Step 1: Create a .NET Console Application
dotnet new console -n MCPCalServer
cd MCPCalServer
This scaffolds a minimal .NET console application.
Step 2: Install the NuGet Packages
dotnet add package ModelContextProtocol --prerelease
dotnet add package Microsoft.Extensions.Hosting
Your `.csproj` file should now look something lie this:
<Project Sdk="Microsoft.NET.Sdk">

  <PropertyGroup>
    <OutputType>Exe</OutputType>
    <TargetFramework>net10.0</TargetFramework>
    <ImplicitUsings>enable</ImplicitUsings>
    <Nullable>enable</Nullable>
  </PropertyGroup>

  <ItemGroup>
    <PackageReference Include="Microsoft.Extensions.Hosting" Version="10.0.6" />
    <PackageReference Include="ModelContextProtocol" Version="1.2.0" />
  </ItemGroup>

</Project>
Replace the contents of `Program.cs` with the following:
using System.ComponentModel;
using Microsoft.Extensions.DependencyInjection;
using Microsoft.Extensions.Hosting;
using Microsoft.Extensions.Logging;
using ModelContextProtocol.Server;


var builder = Host.CreateApplicationBuilder(args);
builder.Logging.AddConsole(
    consoleLogOptions =>
    {
        consoleLogOptions.LogToStandardErrorThreshold = LogLevel.Trace;
    }
);

builder.Services
        .AddMcpServer()
        .WithStdioServerTransport()
        .WithToolsFromAssembly();
await builder.Build().RunAsync();


[McpServerToolType]
public static class CalculatorTool
{
    [McpServerTool, Description("Add two numbers")]
    public static string Add(int a , int b) => $"Sum {a +b}";
}
Let’s Break This Down
1. Host Setup
var builder = Host.CreateApplicationBuilder(args);
We use the .NET Generic Host (`Microsoft.Extensions.Hosting`) to create a long-lived application. This gives us dependency injection, configuration, and graceful shutdown out of the box.
2. Logging Configuration
builder.Logging.AddConsole(

consoleLogOptions =>

{

consoleLogOptions.LogToStandardErrorThreshold = LogLevel.Trace;

}

);
We configure console logging to write to **stderr**. This is important because MCP uses **stdio** (stdin/stdout) as the transport layer. If logs went to stdout, they would corrupt the MCP protocol messages. By directing logs to stderr, we keep the communication channel clean.
3. MCP Server Registration
builder.Services

.AddMcpServer()

.WithStdioServerTransport()

.WithToolsFromAssembly();
This is where the magic happens:
AddMcpServer()— Registers the MCP server into the dependency injection container.
WithStdioServerTransport()— Configures the server to communicate over standard input/output. This is the most common transport for local MCP servers.
WithToolsFromAssembly()— Automatically discovers and registers all classes marked with `[McpServerToolType]` in the current assembly. No manual registration needed.
4. The Calculator Tool
[McpServerToolType]

public static class CalculatorTool

{

[McpServerTool, Description(”Add two numbers”)]

public static string Add(int a, int b) => $”Sum {a + b}”;

}[McpServerToolType]— Marks the class as containing MCP tools.
[McpServerTool]— Marks the method as an invocable tool.
Description(”Add two numbers”)— This description is sent to the LLM, helping it understand when and how to use the tool. Think of it as the tool’s documentation for the AI.
- The method parameters (`int a`, `int b`) are automatically exposed as the tool’s input schema. The MCP SDK handles serialization and deserialization for you.
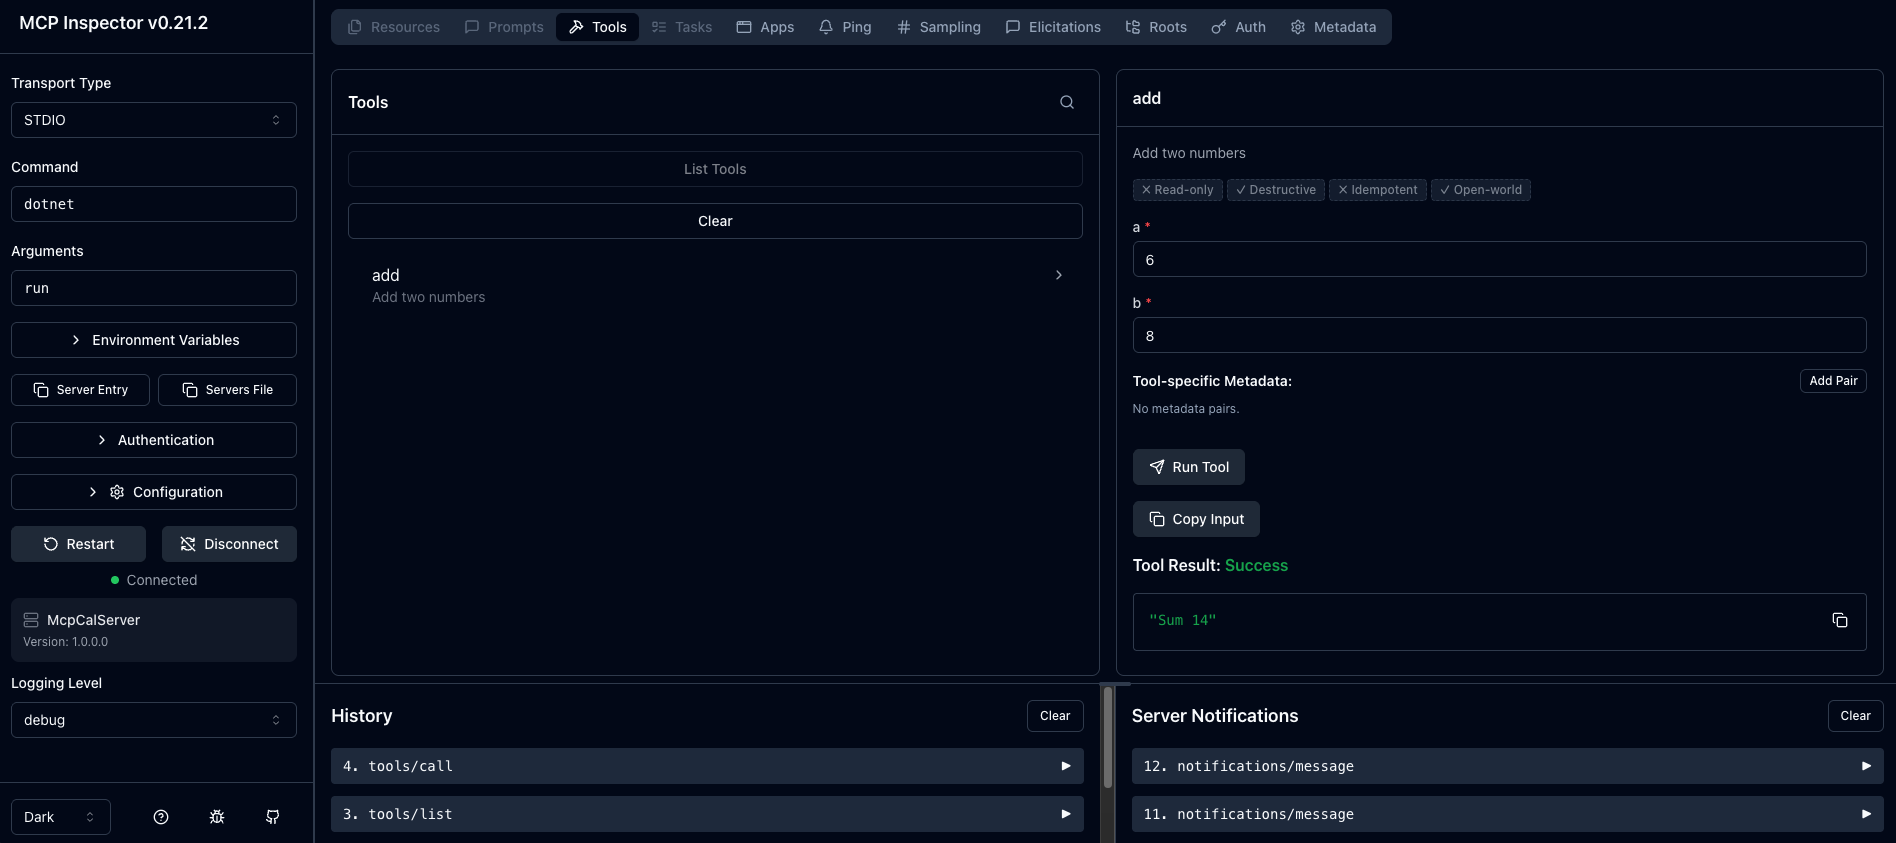
Step 4: Test with MCP Inspector
MCP provides an Inspector tool that lets you interact with your server directly — without needing a full AI host application. It’s invaluable for development and debugging.
Run the following command from your project directory:
npx @modelcontextprotocol/inspector dotnet run
This will:
1. Start your MCP server (`dotnet run`)
2. Launch the MCP Inspector web UI
3. Connect the inspector to your server over stdio
Using the Inspector
Once the inspector is running, you should see your server’s tools listed. Here’s what to expect:
1. **Connect** to the server by clicking the “Connect” button.
2. Navigate to the **Tools** tab — you’ll see `Add` listed with its description “Add two numbers”.
3. Click on the `Add` tool to expand it.
4. Provide input values for `a` and `b` (e.g., a = 6 , b = 8).
5. Click **Run Tool** — you’ll see the output: `Sm 14`.
What’s Happening Under the Hood?
When you run the inspector, here’s the flow:
1. The **MCP Inspector** (client) spawns your server process and connects via **stdio**.
2. The client sends an `initialize` request, and the server responds with its capabilities (tools, resources, prompts).
3. When you invoke a tool from the inspector, it sends a `tools/call` request with the tool name and arguments.
4. The server routes the request to the matching method (`CalculatorTool.Add`), executes it, and returns the result.
5. The inspector displays the result.
This is the exact same protocol flow that happens when an LLM host like Claude Desktop or VS Code Copilot calls your tool.
What’s Next?
Congratulations on building your first MCP server! In the upcoming articles, we’ll explore:
- Adding more complex tools with multiple operations
- Exposing **Resources** to provide context to LLMs
- Using **Prompts** for structured text generation
- Connecting this server to a real AI host application
Thanks for following along — happy building!